Helmert Transformation

Objective:
In this module we will perform a Helmert Transformation to adjust our imported Field Data to our PPP.
Movie:
 Helmert Transformation Helmert Transformation |
| General - Helmert Transformation |
Assignment:
- With all our Field Data in the project, now we need to adjust the Field Data to match the PPP points. For this, we will be using the Helmert Transformation, which can be found on the Points ribbon. If at this point you have not completed the import, you can open Part3.dwg from your CAD folder (materials\5.0 Real World Example One\CAD) and continue from there.
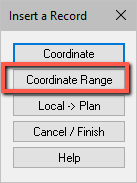
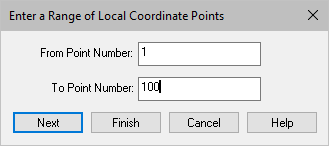
- Once you have opened the Helmert Transformation DIALOG, or run the command ms_helmert, a window will display the options below. We are going to start by clicking on Insert to start adding our data. From the next window, select Coordinate Range and change the From Point Number to 1 and the To Point Number to 100. This will allow us to adjust all points 1 to 100, which should be the range for our field points in this example. Then click on Finish, as we wont be adding anymore point ranges.
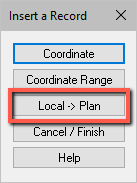
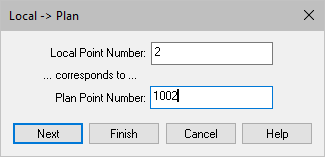
- Now, click on Local -> Plan. This is where we are going to add our PPP points to match our field points. For the Local Point Number, type in 2 and for the Plan Point Number, type in 1002. Click on Next and do the same for local point 3 and plan point 1003. Then click on Finish.
- Now we have inserted all our data. Click on Cancel / Finish to move to the next part of the transformation. Here, you can see your list of points that will be transformed, and on the bottom the Plan and Local points used. If everything appears correct, click on OK.
- A dialog should appear mentioning a scale, in this example it will be about 0.99973657. This is the scale used to transform all our points to best fit the PPP points. In this example, we do not want to scale our points, we just want to shift and rotate them to the PPP points, so click on NO.
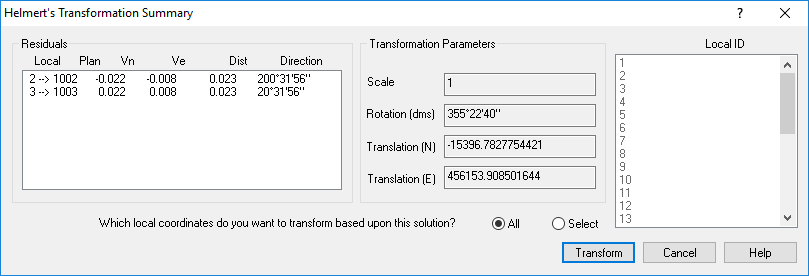
- The next and final dialog should be the Summary. This is where we can do a final check and see by how much our Local to Plan points will be shifted. In this case, we can see a shift of about 23mm for both points 2 and 3, as it is weighting them equally since we have just the 2 points. On the right side, if you toggle on Select, you can select which points you want to transform, but in this case we are going to use what we started with, which is All. Click on Transform.
    
    
0 comments